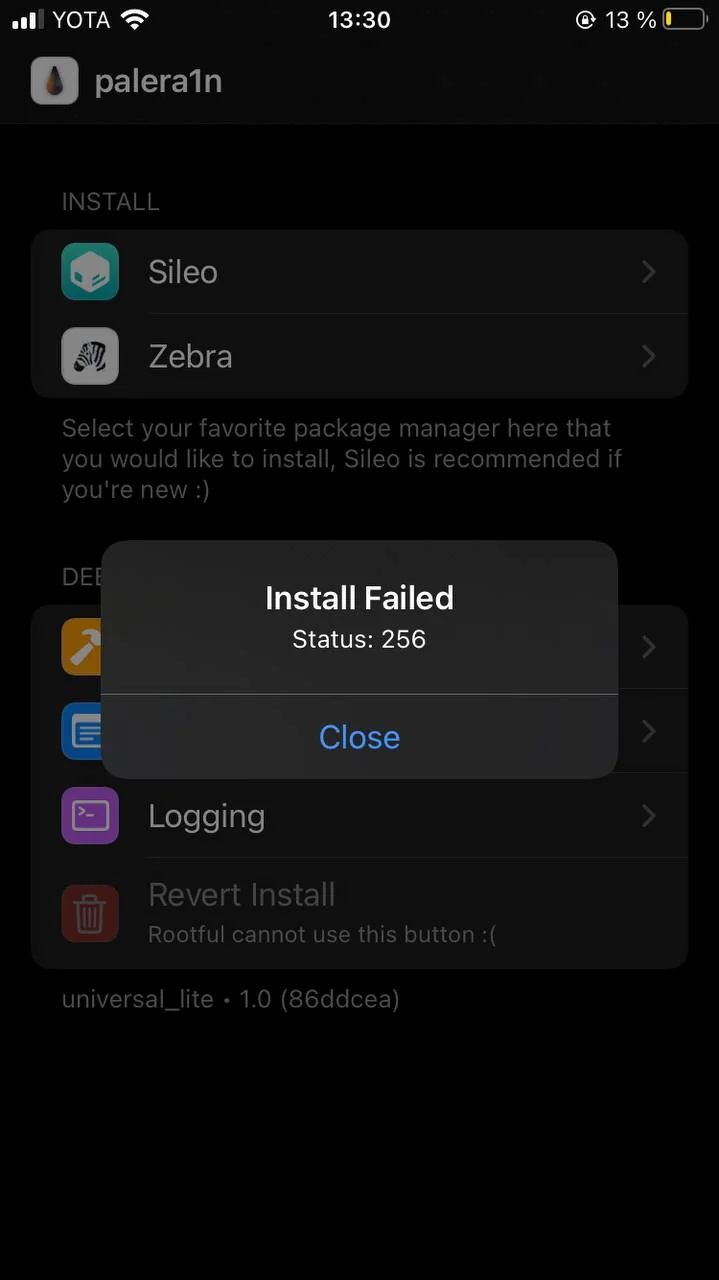
Apple Jailbreak Tutorial supports iOS/iPadOS 16.7.12, 17.7.10, 18.7.1 systems. iOS 16.4+ version is actually supported when Palera1n was updated to v2.0.0 beta, but due to the fact that there is a rooted jailbreak that will appear when you install SileoInstall Failed - Status: 256 Error code, so there has been no published tutorial out there.
Palera1n supported models
| iPhone | iPad | iPod (loanword) | Apple TV |
|---|---|---|---|
| iPhone 6s | iPad mini 4 | iPod Touch (7th generation) | Apple TV HD |
| iPhone 6s Plus | iPad (5th generation) | Apple TV 4K (first generation) | |
| iPhone SE (2016) | iPad (6th generation) | ||
| iPhone 7 | iPad (7th generation) | ||
| iPhone 7 Plus | iPad Pro (9.7-inch) | ||
| iPhone 8 | iPad Pro (12.9-inch) (first generation) | ||
| iPhone 8 Plus | iPad Pro (10.5-inch) | ||
| iPhone X | iPad Pro (12.9-inch) (2nd generation) | ||
| iPad Air 2 |
On May 30th Palera1n officially released v2.0.0 Beta 7 and fixed the 256/512 bug, you can find it on thePalera1n official websiteView more changelogs andDownload Palera1nIts main changes are as follows (it has been updated to 2.0 official version compatible with iOS17.6+/18 system in July):
- Fixed an issue where 16.0 beta 1 (20A5283p) could not be jailbroken.
- Fixed 256/512 error during bootloader installation under rooted jailbreak.
- fixed
--force-revertUnable to find rootless problem with bootstrap hash.


Q: What versions are supported?
A: Among the above supported models, iOS15.0 - 15.8.5 , iOS16.0 - 16.7.12 , iOS17.0 - 17.7.10 , iOS18.0 - 18.7.1 are supported.
Jailbreak Tutorial
Previously published palera1n rooted jailbreak tutorial, you can view the tutorial below, you just need to download the new version of Palera1n and follow the previous tutorials to complete the iOS15 ~ iOS18 version of the jailbreak, this article mainly explains the unrooted jailbreak tutorials, there is no system directory write permissions, such as the need for a full system directory write permissions, you may need to use a rooted jailbreak!

On A11 devices iPhone 8 / 8 Plus /X iOS 16 devices if you have previously set a lock screen passcode, you must erase all content and data and then activate the device without setting a passcode to complete the jailbreak. iOS15/16/17 on either A11 will not be able to use your passcode or other SEP features until you have reverted back to an un-jailbroken state. SEP features include Passcode, Face ID/Touch ID, and Apple Pay, among others.
Install palera1n
- Enable full disk access for the terminal (this only needs to be done once)
- macOS Monterey and below: System Preferences → Security and Privacy → Privacy → Full Disk Access macOS Ventura and above: System Settings → Privacy and Security → Full Disk Access
- If you are using macOS Monterey 12.2.1 or lower, run the following command (you only need to run it once):
sudo python -m ensurepip
sudo python -m pip install setuptools xattr==0.6.4- Open a terminal window and
cdGo to the directory that palera1n downloaded to (usually thecd ~/Downloads). - (of a computer) run
sudo mkdir /usr/local/bin - If you receive a message saying
mkdir: /usr/local/bin: File existsPlease ignore it. - (of a computer) run
sudo mv . /palera1n-macos-universal /usr/local/bin/palera1n - interchangeability
. /palera1n-macos-universalFor any version you download - (of a computer) run
sudo xattr -c /usr/local/bin/palera1n - (of a computer) run
sudo chmod +x /usr/local/bin/palera1n
Run Palera1n
- (of a computer) run
palera1n- Make sure your device is plugged in when you enter this command.
- When ready, press
Enterand follow the on-screen instructions to enter DFU mode.
In the terminal window, press the keyboard
Control+CRerun the command you just ran, you will also need to do this each time you re-jailbreak your device.If you do encounter problems, you should follow this guide using a Mac or a computer with an Intel CPU.
Installation of Palera1n
- Open a terminal window
- (of a computer) run
sudo systemctl stop usbmuxd - (of a computer) run
sudo usbmuxd -f -p - Open a new terminal window and
cdGo to the palera1n directory (usually thecd ~/Downloads). - (of a computer) run
sudo mv . /palera1n-linux-* /usr/bin/palera1n - (of a computer) run
sudo chmod +x /usr/bin/palera1n
Run Palera1n
If you do have a problem, purchase a USB-A to Lightning cable and, if necessary, a USB-C to USB-A adapter.
- (of a computer) run
sudo palera1n- Make sure your device is plugged in when you enter this command.
- When ready, press
Enterand follow the on-screen instructions to enter DFU mode.
In the terminal window, press the keyboard
Control+CRerun the command you just ran, you will also need to do this each time you re-jailbreak your device.If you do encounter problems, you should follow this guide using a Mac or a computer with an Intel CPU.
request
- A 64MB or larger USB drive
- If you don't have a USB drive, but have another form of supported removable bootable hardware (such as a CD or DVD), you can use it instead of a USB drive
- Latest version of palen1x
- Ventoy
Installing Ventoy
- Download Ventoy to your computer
- Insert your USB drive (if you haven't already done so) and start the
Ventoy2Disk.exefile - Select the USB drive you have inserted
- Existing data on this USB drive will be completely erased.
- Ensure that all important data is backed up beforehand
- Click Install and confirm to erase the USB drive.
- Do not remove your USB drive until the process is complete!
- Once the installation is complete, copy the downloaded palen1x iso file to a USB drive.
Starting Palen1x
- Reboot, then go to your BIOS setup and disable Secure Boot, then go to the boot selector and select the USB drive from which you want to boot
- Every computer is different.
- If you're not sure, search for your PC or motherboard brand to learn how to enter BIOS setup
- When you see the Ventoy screen, press Enter to boot into palen1x.
Run Palera1n
If you do have a problem, purchase a USB-A to Lightning cable and, if necessary, a USB-C to USB-A adapter.
- After loading palen1x, select
palera1n - option
Switchand then selectRootless - Press the arrow keys
right clickempressEnterand then selectStart - Make sure your device is plugged in when performing this operation.
- Follow the on-screen instructions to enter DFU mode.
In the terminal window, press the keyboard
Control+C Type exit
Re-execute the Start operation above
Activate Jailbreak
- After loading palen1x, select
palera1n - option
Switchand then selectRootless - Press the arrow keys
right clickempressEnterand then selectStart - Make sure your device is plugged in when performing this operation.
- Follow the on-screen instructions to enter DFU mode A9X and earlier devices as above.
- The device boots up and returns to normal
设备启动后,打开 palera1n 加载程序应用程序并点击Sileo等待安装完成后返回到主屏幕打开即可正常使用。